
Wednesday, February 27, 2008

Three-Step Bias Tape Installation


When I started sewing, one of my first projects was a simple jumper with bias-tape bound neck and armholes. After some experiences in which seam rippers figured prominently, I asked mom to put the bias tape in.

Biased (haha) by these early experiences, I regarded bias tape as a nuisance that usually ended with unwanted slivers of bias tape peeking over the edge of the finished seam, until I mastered the art of 3-step bias tape installation.
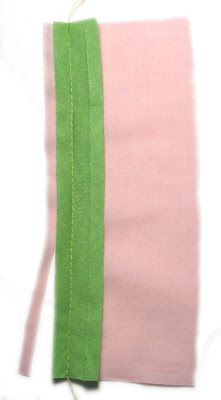
Fold open one side of the bias tape. Pin it, right side of the bias tape to the right side of your fabric, so that when you sew in the crease of the fold, your seam allowance will be 5/8" (or whatever seam allowance your pattern calls for). Sew, being sure to stay in the crease line on the bias tape. Trim off excess fabric at the seam allowance.

Fold the bias tape towards the seam allowance and iron. Stitch 1/8" or so from the edge of the bias tape that is sewn to the fabric. This line of stitching is the secret to a clean, finished edge!
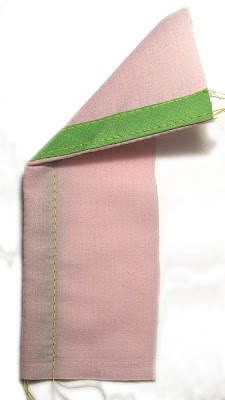
Fold the bias tape over to the wrong side of fabric and stitch it close to edge of bias tape. Because of the second line of stitching, it should fold over nicely and give you a sharp edge without any bias tape showing on the right side of your fabric.

Thursday, February 14, 2008

Blocking a Lace Shawl


I finished my pink alpaca shawl this week. It's always fun to take a project off the needles so you can see what it really looks like. I was amazed at the size of this shawl! Deciding where to block it took a little thought, but I finally decided that the best place was a large mattress the kids play on. Even that was scarcely big enough--I had to wrap the shawl around the edges when I pinned it!The shawl before blocking. Here are directions on blocking lace from Knitpicks.
I dampened the shawl, then rolled it in a towel to squeeze out the extra water.
Many minutes and 145 pins later, the shawl was stretched out and pinned to the mattress at each scalloped edge. I issued stern injunctions against jumping or stepping on said mattress, and the shawl was ready to dry.

Friday, February 8, 2008

Organizing Sewing Supplies


Sewing requires a lot of little tools: the pins, needles and pincushions, thread, scissors, tape measures, buttons, seam ripper, thimble . . . How to keep them all organized? Fabric stores are full of organizing helps and special containers for every sort of sewing gear, but I hate to spend money on storage--especially with my poor track record for keeping things in their own specific box!

I have a bad habit of scattering my sewing supplies and projects all through the house. I will admit right now that when it comes to "organized", I am the last person who should talk, but I do try to simplify my system and stick to it. Here is what works to contain the sewing supplies that find their way to my room: a three-tiered tray.

I bought this tray on Ebay, but I picked up another one secondhand for only a few dollars. Little things, like the seam ripper, wrist-pincushion, and embroidery scissors, sit on the top tier, while thread fills up the second tier. The lowest level holds scissors, a tape measure, a handmade felted rose pincushion, and a solitary, saucer-less teacup filled with assorted buttons and a few dulled sewing machine needles I use when sewing paper.

If you have no specific sewing area, limited space, or no cabinets to keep your sewing paraphernalia out of sight, a pretty tiered tray may be just the thing to hold your sewing supplies. It's pretty enough to be stored on an open shelf, can be easily carried to or from your sewing area, and gives you multiple levels to organize your supplies.