Showing posts with label how-to. Show all posts

Friday, June 13, 2008

Fashion [re]Model: Dress to Skirt

Here is one of my latest sewing projects: a 25-cent thrift store dress that has been remodeled to become one of my very favorite skirts! With so many colors in the floral print, it can be matched with almost every shirt in my closet!

First I ripped out the sleeves and shoulder seams. I tried it on and pinned the side seams before I cut the extra material off. Below is a diagram showing the approximate cutting lines:
The dress had a short zipper in the center back. I ripped it out and moved it down to line up with the new waistline, and finished the waistline with a simple, narrow hem that won't add bulk.

So there it is: the best quarter I've spent in a long time!

Be sure to visit the Biblical Womanhood blog for more Frugal Friday ideas!

Monday, April 14, 2008

The Day-Before-Easter Circle Skirt

On the Friday evening before Easter, my sister decided that she wanted a new skirt to wear on Sunday. Fortunately, the size of our fabric stash makes such spur-of-the-moment projects possible! We found some pretty spring-colored calico and sent it to the washing machine so it would be ready to cut out on Saturday morning.

I folded the fabric to form a square, then cut the pieces out without a pattern, using pins to mark a few important lines. Because of the size of the fabric, the skirt had three seams: one at each side and one in the center back. The only measurements I needed were the waist to hem length (though that was determined by the size of the fabric) and the waist measurement. We decided to put in an elasticized waistband, so the waist measurement took that into account.

Here is a diagram showing how the pieces were cut out:
My sister did all of the sewing herself (with the exception of the top stitching on the bias tape, when I took pity on her!) and was able to finish the skirt by early Saturday afternoon.

We decided to bind the hem with double fold bias tape for three reasons:

1. The fabric was so lightweight I thought it would benefit from a heavier and more defined hemline.

2. The pink of the bias tape helped bring out the pink flowers in the fabric, which were otherwise lost in a sea of blue-green.

3. Circular skirts are a pain to hem. =D

Tuesday, April 8, 2008

Adapting the Shawl Collar Dress for Nursing

A mother asked me if I had any ideas for altering the Shawl Collar Dress so that it can be worn as a nursing dress. After a much-too-long delay, here is my proposed solution:

There would be an inner front waistband sewn to the skirt and the center front inset. The outer waistband, sewn to the two fronts of the bodice, would be attached to the inner waistband and each other by snaps (the circles) and skirt hooks and eyes (the dots).

Here is a diagram showing how to cut out the inset, using as a guide the bodice pattern and the original triangular inset piece.

I have not tested this idea, so I will not guarantee that it works! If you try this, or have discovered your own way to adapt the pattern for nursing mothers, I would love to hear about it.

Friday, March 7, 2008

Bias Tape on a Curve


Putting bias tape on a straight seam is one thing. How does a curved seam (such as a neckline) affect the way bias tape works? Here are instructions for putting bias tape on a curve.

The green bias tape is single fold, and the dark pink is double fold. The finished double fold bias tape hem is narrower, but slightly thicker.

Before you pin or sew the bias tape, lay it on your ironing board and curve it to match the curve of your fabric. Iron it well, using lots of steam.

Fold open one side of the bias tape. Pin it, right side of the bias tape to the right side of your fabric, so that when you sew in the crease of the fold, your seam allowance will be 5/8″ (or whatever seam allowance your pattern calls for). Sew, being sure to stay in the crease line on the bias tape. Trim off excess fabric at the seam allowance.

Clip the seam along the curved area, being careful not to cut into the stitches. This will allow the fabric in the seam allowance to lay flat, without binding and puckering up the curved seam.

Fold the bias tape towards the seam allowance and iron. Stitch 1/8″ or so from the edge of the bias tape that is sewn to the fabric. This line of stitching is the secret to a clean, finished edge!

If you are using double fold bias tape, fold it over and around the seam.

Fold the bias tape over to the wrong side of fabric. Pin it carefully before you sew to make sure that the fabric doesn't shift as you are sewing. That will create diagonal puckers from the seam to the topstitching.

Stitch close to the edge of the bias tape. Because of the second line of stitching, it should fold over nicely and give you a sharp edge without any bias tape showing on the right side of your fabric.

Wednesday, February 27, 2008

Three-Step Bias Tape Installation


When I started sewing, one of my first projects was a simple jumper with bias-tape bound neck and armholes. After some experiences in which seam rippers figured prominently, I asked mom to put the bias tape in.

Biased (haha) by these early experiences, I regarded bias tape as a nuisance that usually ended with unwanted slivers of bias tape peeking over the edge of the finished seam, until I mastered the art of 3-step bias tape installation.

Fold open one side of the bias tape. Pin it, right side of the bias tape to the right side of your fabric, so that when you sew in the crease of the fold, your seam allowance will be 5/8" (or whatever seam allowance your pattern calls for). Sew, being sure to stay in the crease line on the bias tape. Trim off excess fabric at the seam allowance.

Fold the bias tape towards the seam allowance and iron. Stitch 1/8" or so from the edge of the bias tape that is sewn to the fabric. This line of stitching is the secret to a clean, finished edge!

Fold the bias tape over to the wrong side of fabric and stitch it close to edge of bias tape. Because of the second line of stitching, it should fold over nicely and give you a sharp edge without any bias tape showing on the right side of your fabric.

Thursday, February 14, 2008

Blocking a Lace Shawl


I finished my pink alpaca shawl this week. It's always fun to take a project off the needles so you can see what it really looks like. I was amazed at the size of this shawl! Deciding where to block it took a little thought, but I finally decided that the best place was a large mattress the kids play on. Even that was scarcely big enough--I had to wrap the shawl around the edges when I pinned it!The shawl before blocking. Here are directions on blocking lace from Knitpicks.
I dampened the shawl, then rolled it in a towel to squeeze out the extra water.
Many minutes and 145 pins later, the shawl was stretched out and pinned to the mattress at each scalloped edge. I issued stern injunctions against jumping or stepping on said mattress, and the shawl was ready to dry.

Thursday, December 13, 2007


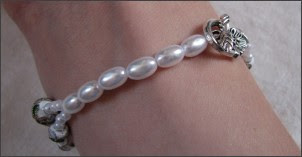
Have you ever picked up your knitting or crocheting project, only to spend the first few minutes figuring out which row of the pattern you're on? These bracelets, which work like an abacus, are a handy--and pretty--way to keep track of your rows. (I'm currently on row 126 of 154 on my pink shawl.)
You'll need:
  • 9 large beads (to count 10s)

  • 9 medium beads (to count 1s)

  • assorted small beads to space out the counting beads and make the marking loops (I used green beads for the loops, and two sizes of pearl beads for the spacers)

  • clasp

  • clear beading thread

  • stretchy beading cord
Using some of your smaller beads and the stretchy beading cord, make two marking loops; one for the 10s and one for the 1s. Make sure the loop is large enough the beads can pass through easily, but not so large that they'll slip through accidentally and throw your counting off. Tie the loops with very secure knots.
Attach the clear beading thread to one half of the clasp using a half hitch. Make sure the two ends of the beading thread are of even lengths.
Begin stringing the counting beads, separated by the small beads, onto the two threads. You will need more spacing beads between the 1 beads than between the 10 beads. Try to space them so that the two strands are of even lengths. Don't forget to slip a marking loop onto each strand!
If you have used all of the counting beads but the bracelet is too short for your wrist, string more beads onto both threads at once until it's the right length.
Tie the threads securely to the other half of the clasp. Pass the threads back through several beads before you cut the ends off.
There you have it--never loose your place in a pattern again!

Saturday, December 1, 2007

Creating a Wedding Dress

When my brother got engaged last spring, his fiancee asked me to make the wedding dress. She gave me a picture she and her sisters had drawn of what it should look like. With the drawing, a very basic princess seam dress pattern and an old blue sheet, we started work one afternoon.

After some reckless cutting of fabric and basting of seams, I had Audra put the mock-up on inside out while I re-pinned the seams, taking in and letting out, basting and re-basting. That first afternoon we got the whole mock-up fitted and decided on the width and positioning of the four triangular skirt insets. Since all of the fitting and figuring was done, the dress went together very quickly once we got the fabric.

Dotted: usual cutting & grain line

Solid: modified cutting & grain line

Cheri asked me about the sleeves on the dress. I cut them out freehand, matching the length of the top of the sleeve to the size of the dress armhole. (And yes, I made a trial sleeve--or two--before I cut into the real fabric!) Audra wanted a flared, yet not butterfly, sleeve. To achieve the desired flutter without extra fullness at the top and middle of the sleeve, I curved the sides of the pattern out, and then cut the piece out on the bias so that it wouldn't bind and would have a nice drape. Very narrow hems, slightly stretched as I sewed, finished the sleeves off with a gentle ripple.

The main fabric was an ivory colored polyester damask, while the sleeves were a slightly textured semi-sheer polyester. The whole dress was lined with unbleached cotton that was finished with French seams on the inside.